
OpenClaw TierFlow Setup
This guide shows how to connect TierFlow to OpenClaw.
Basic information:
| Item | Value |
|---|---|
| Base URL | http://47.99.200.103:8003/v1 |
| Authentication | Bearer Token |
| Protocol | OpenAI API Compatible |
| Provider ID | custom-47-99-200-103-8003 |
| Model ID | auto |
| OpenClaw Model | custom-47-99-200-103-8003/auto |
OpenClaw will send requests to:
POST http://47.99.200.103:8003/v1/chat/completionsMethod 1: Interactive Wizard
This is the recommended method for new users. Follow the terminal prompts step by step, then increase the context window after setup.
1. Open a Terminal
First confirm which terminal you are using.
If you are using a WSL Ubuntu terminal, run:
openclaw onboard --install-daemonIf you are using Windows PowerShell, but OpenClaw is installed inside WSL Ubuntu, run:
wsl.exe -d Ubuntu bash -lc 'openclaw onboard --install-daemon'If OpenClaw is installed directly on macOS or Linux, run:
openclaw onboard --install-daemonIf OpenClaw is installed directly on Windows, run:
openclaw onboard --install-daemon2. Confirm the Basic Setup
The wizard will ask a few basic questions first.
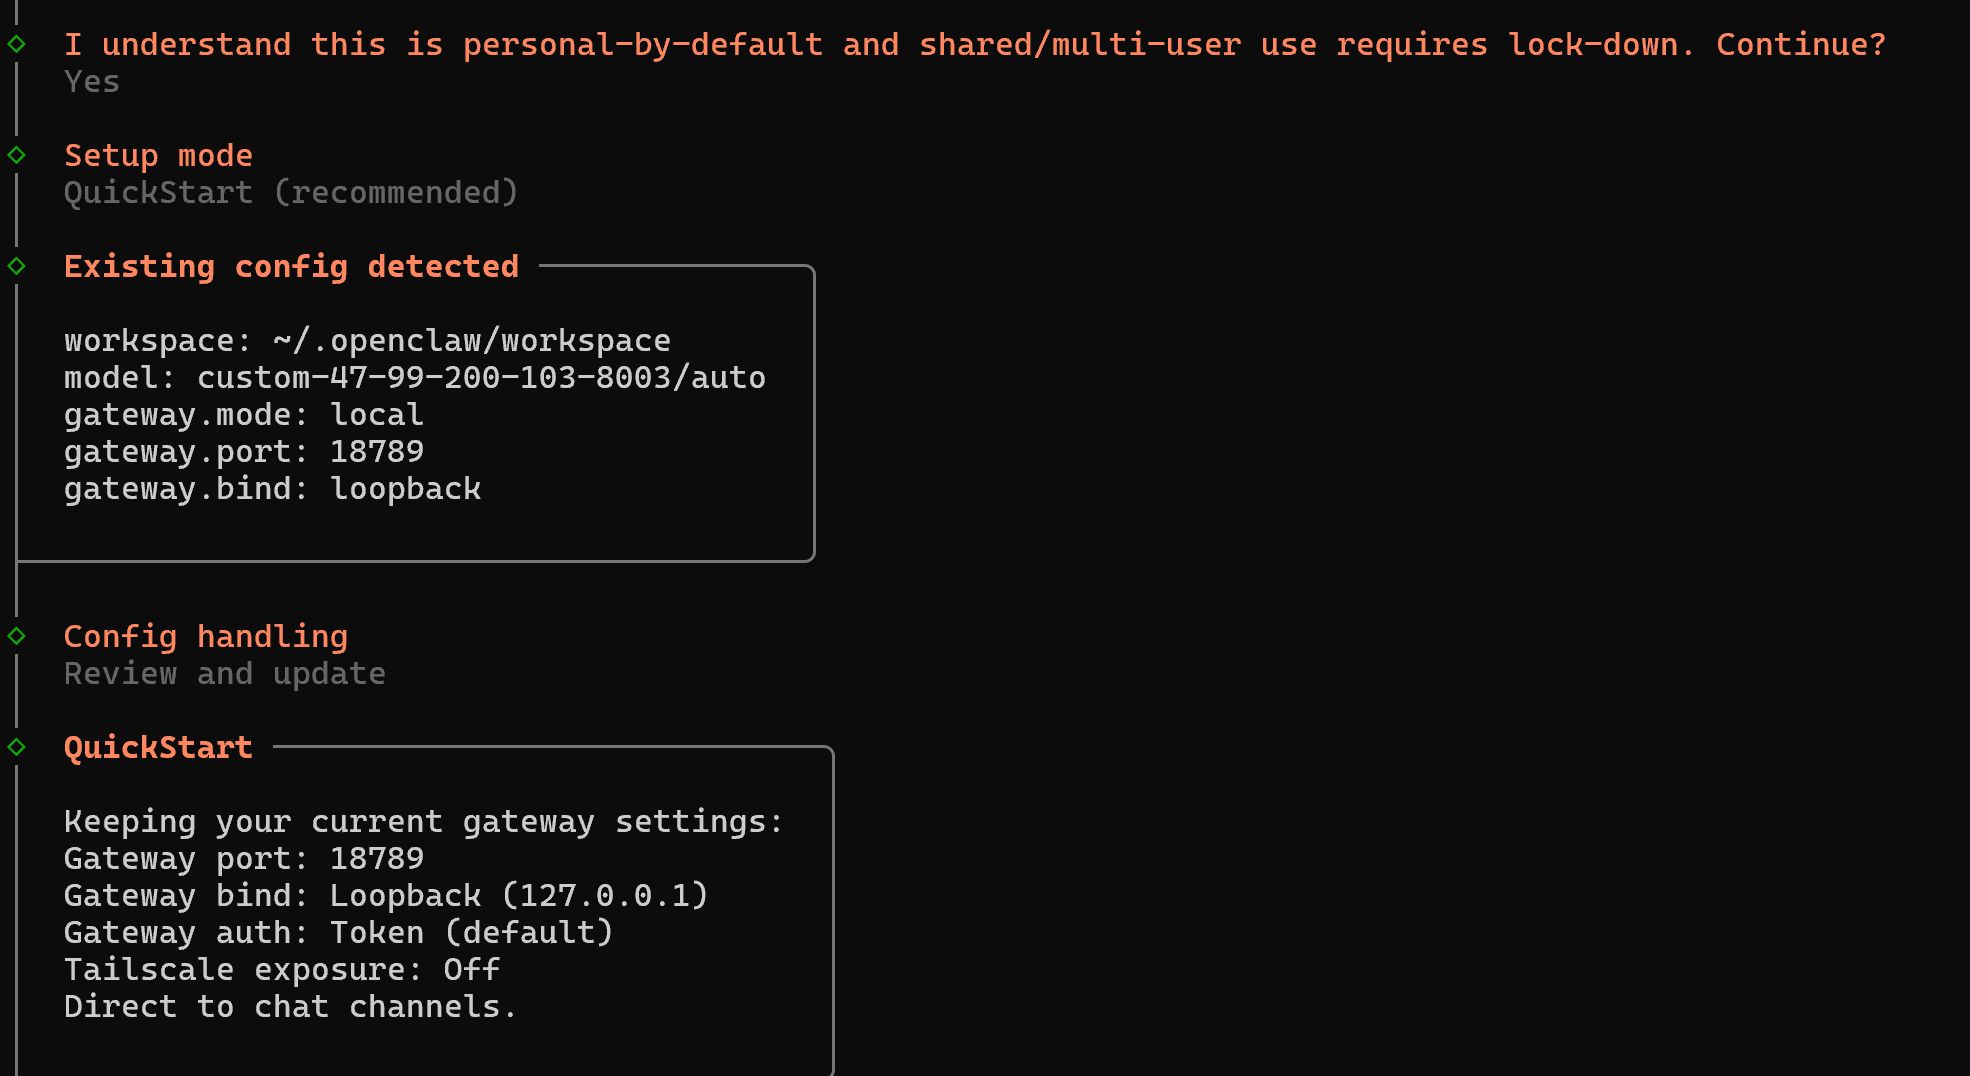
Choose:
I understand this is personal-by-default and shared/multi-user use requires lock-down. Continue? -> Yes
Onboarding mode -> QuickStart
Config handling -> Review and update
If this is your first installation and there is no existing config, continue with the recommended defaults.
3. Select the Model Provider
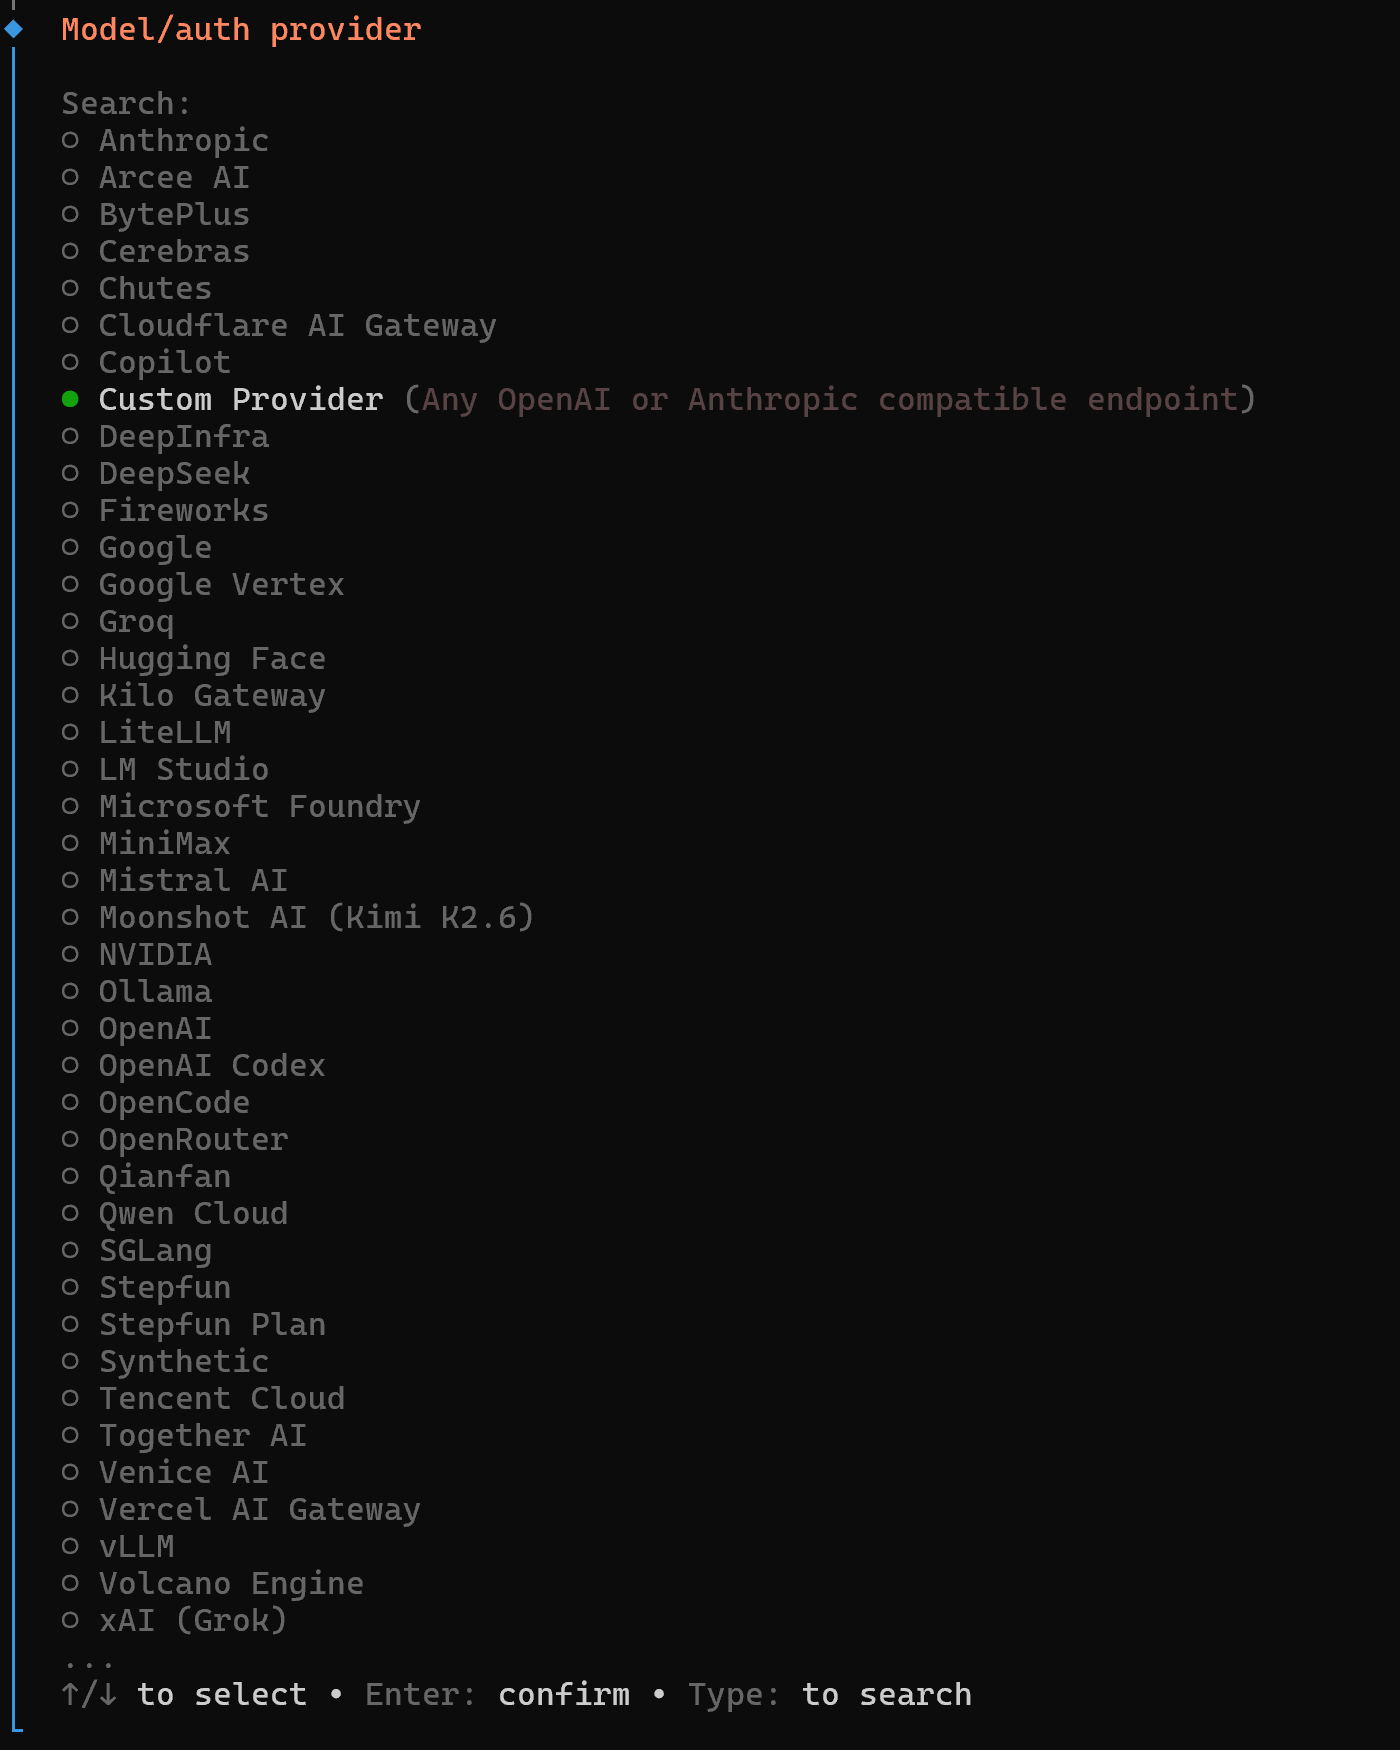
For the model or authentication provider, select:
Model/auth provider -> Custom ProviderSome versions may show:
Custom Provider (Any OpenAI or Anthropic compatible endpoint)Select the Custom Provider option.
4. Enter the Custom API Information
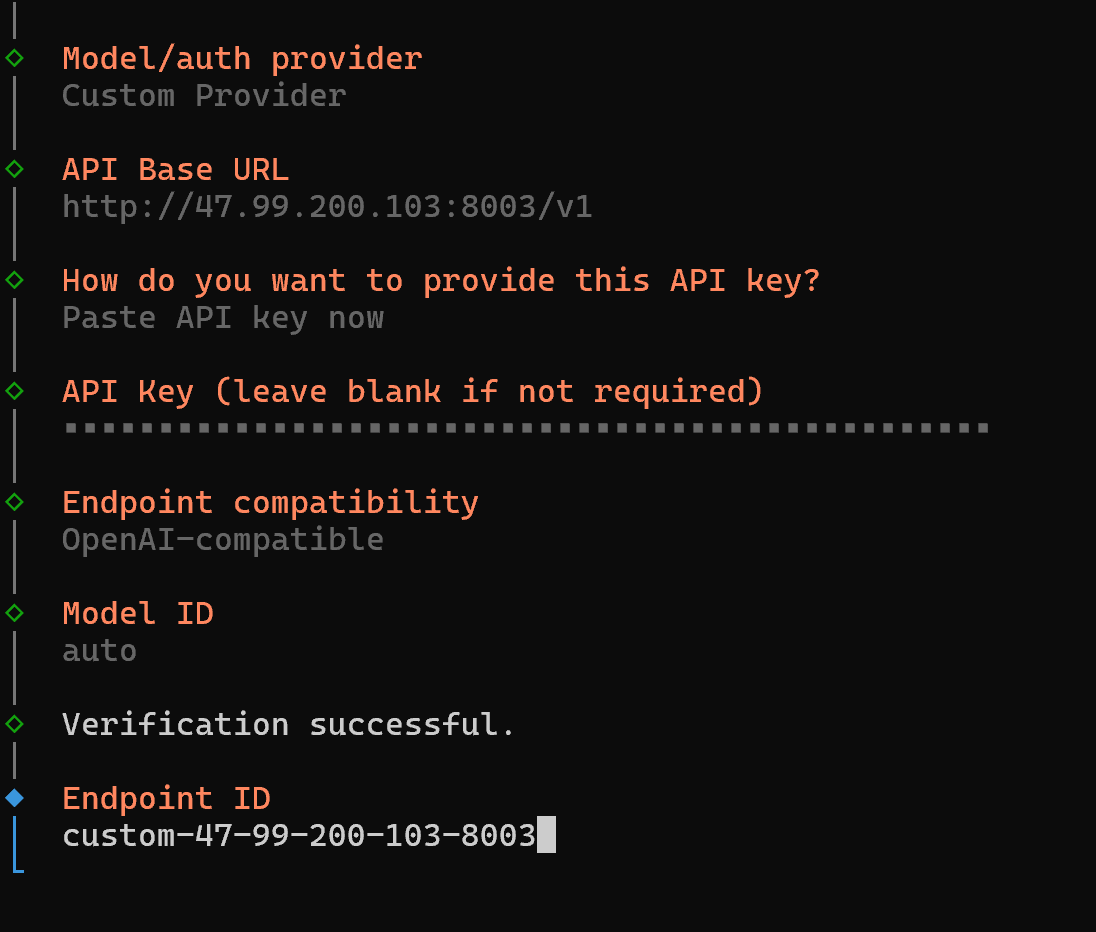
Fill in:
Model/auth provider -> Custom Provider
API Base URL -> http://47.99.200.103:8003/v1
How do you want to provide this API key? -> Paste API key now
API Key -> your API key
Endpoint compatibility -> OpenAI-compatible
Model ID -> auto
Verification successful.
Use this fixed Model ID:
autoIf the wizard asks for Endpoint ID, keep the default value generated by the wizard. No extra setup is required.
If the wizard asks for input capability, select:
Input capability -> textIf it asks whether image input is supported, select:
Image input -> No5. Finish the Remaining Setup
Select channel -> Choose the channel you need
Configure skills -> Install the skills you need
Complete Setup -> Finish setup
6. Test the Bot
How do you want to hatch your bot? -> You can chat with the bot in TUI or Web UITUI:
openclaw tuiIf the conversation works, the configuration is successful.
7. Reconfigure the Model Only
If OpenClaw is already installed and you only want to reconfigure the model, you do not need to run the full onboarding flow.
WSL Ubuntu / Linux / macOS:
openclaw configure --section modelWindows PowerShell calling WSL:
wsl.exe -d Ubuntu bash -lc 'openclaw configure --section model'Native Windows installation:
openclaw configure --section modelThen continue from the provider selection step.
8. Increase the Context Window
The wizard may write a conservative context size for custom models. This API is a model router, so use:
contextWindow: 1000000
maxTokens: 128000
WSL Ubuntu terminal / Linux / macOS:
cat <<'JSON' | openclaw config patch --stdin
{
  "models": {
    "providers": {
      "custom-47-99-200-103-8003": {
        "models": [
          {
            "id": "auto",
            "name": "auto (Custom Provider)",
            "reasoning": false,
            "input": ["text"],
            "cost": {
              "input": 0,
              "output": 0,
              "cacheRead": 0,
              "cacheWrite": 0
            },
            "contextWindow": 1000000,
            "maxTokens": 128000,
            "api": "openai-completions"
          }
        ]
      }
    }
  }
}
JSON
Windows PowerShell calling WSL:
$patch = @'
{
  "models": {
    "providers": {
      "custom-47-99-200-103-8003": {
        "models": [
          {
            "id": "auto",
            "name": "auto (Custom Provider)",
            "reasoning": false,
            "input": ["text"],
            "cost": {
              "input": 0,
              "output": 0,
              "cacheRead": 0,
              "cacheWrite": 0
            },
            "contextWindow": 1000000,
            "maxTokens": 128000,
            "api": "openai-completions"
          }
        ]
      }
    }
  }
}
'@

$b64 = [Convert]::ToBase64String([Text.Encoding]::UTF8.GetBytes($patch))
wsl.exe -d Ubuntu bash -lc "echo $b64 | base64 -d | openclaw config patch --stdin"
Native Windows installation:
Use the same $patch = @' ... '@ content above, then run:
$patch | openclaw config patch --stdin9. Restart the Gateway
WSL Ubuntu / Linux / macOS:
openclaw gateway restartWindows PowerShell calling WSL:
wsl.exe -d Ubuntu bash -lc 'openclaw gateway restart'Native Windows installation:
openclaw gateway restartMethod 2: Edit the Config Manually
Use this method if you prefer editing openclaw.json yourself.
1. Find the Config File
WSL Ubuntu / Linux / macOS:
openclaw config fileWindows PowerShell calling WSL:
wsl.exe -d Ubuntu bash -lc 'openclaw config file'Native Windows installation:
openclaw config fileThe path is usually:
~/.openclaw/openclaw.json2. Merge This Config
Merge the following content into openclaw.json. If the file already contains models or agents.defaults.models, keep the existing content and only add this provider and model entry.
{
  "models": {
    "mode": "merge",
    "providers": {
      "custom-47-99-200-103-8003": {
        "baseUrl": "http://47.99.200.103:8003/v1",
        "apiKey": "YOUR_API_KEY_HERE",
        "api": "openai-completions",
        "models": [
          {
            "id": "auto",
            "name": "auto (Custom Provider)",
            "reasoning": false,
            "input": ["text"],
            "cost": {
              "input": 0,
              "output": 0,
              "cacheRead": 0,
              "cacheWrite": 0
            },
            "contextWindow": 1000000,
            "maxTokens": 128000,
            "api": "openai-completions"
          }
        ]
      }
    }
  },
  "agents": {
    "defaults": {
      "model": {
        "primary": "custom-47-99-200-103-8003/auto"
      },
      "models": {
        "custom-47-99-200-103-8003/auto": {}
      }
    }
  }
}
3. Validate and Restart
WSL Ubuntu / Linux / macOS:
openclaw config validate
openclaw gateway restart
Windows PowerShell calling WSL:
wsl.exe -d Ubuntu bash -lc 'openclaw config validate && openclaw gateway restart'Native Windows installation:
openclaw config validate
openclaw gateway restart
Method 3: Optional Command Write
Use this only if you already understand the config and want to write it quickly. New users should use the interactive wizard or manual editing method first.
WSL Ubuntu Terminal / Linux / macOS
Replace YOUR_API_KEY_HERE with your API key:
cat <<'JSON' | openclaw config patch --stdin
{
  "models": {
    "mode": "merge",
    "providers": {
      "custom-47-99-200-103-8003": {
        "baseUrl": "http://47.99.200.103:8003/v1",
        "apiKey": "YOUR_API_KEY_HERE",
        "api": "openai-completions",
        "models": [
          {
            "id": "auto",
            "name": "auto (Custom Provider)",
            "reasoning": false,
            "input": ["text"],
            "cost": {
              "input": 0,
              "output": 0,
              "cacheRead": 0,
              "cacheWrite": 0
            },
            "contextWindow": 1000000,
            "maxTokens": 128000,
            "api": "openai-completions"
          }
        ]
      }
    }
  },
  "agents": {
    "defaults": {
      "model": {
        "primary": "custom-47-99-200-103-8003/auto"
      },
      "models": {
        "custom-47-99-200-103-8003/auto": {}
      }
    }
  }
}
JSON

openclaw gateway restart
Windows PowerShell Calling WSL
Replace YOUR_API_KEY_HERE with your API key:
$patch = @'
{
  "models": {
    "mode": "merge",
    "providers": {
      "custom-47-99-200-103-8003": {
        "baseUrl": "http://47.99.200.103:8003/v1",
        "apiKey": "YOUR_API_KEY_HERE",
        "api": "openai-completions",
        "models": [
          {
            "id": "auto",
            "name": "auto (Custom Provider)",
            "reasoning": false,
            "input": ["text"],
            "cost": {
              "input": 0,
              "output": 0,
              "cacheRead": 0,
              "cacheWrite": 0
            },
            "contextWindow": 1000000,
            "maxTokens": 128000,
            "api": "openai-completions"
          }
        ]
      }
    }
  },
  "agents": {
    "defaults": {
      "model": {
        "primary": "custom-47-99-200-103-8003/auto"
      },
      "models": {
        "custom-47-99-200-103-8003/auto": {}
      }
    }
  }
}
'@

$b64 = [Convert]::ToBase64String([Text.Encoding]::UTF8.GetBytes($patch))
wsl.exe -d Ubuntu bash -lc "echo $b64 | base64 -d | openclaw config patch --stdin && openclaw gateway restart"
Native Windows Installation
Replace YOUR_API_KEY_HERE with your API key:
$patch = @'
{
  "models": {
    "mode": "merge",
    "providers": {
      "custom-47-99-200-103-8003": {
        "baseUrl": "http://47.99.200.103:8003/v1",
        "apiKey": "YOUR_API_KEY_HERE",
        "api": "openai-completions",
        "models": [
          {
            "id": "auto",
            "name": "auto (Custom Provider)",
            "reasoning": false,
            "input": ["text"],
            "cost": {
              "input": 0,
              "output": 0,
              "cacheRead": 0,
              "cacheWrite": 0
            },
            "contextWindow": 1000000,
            "maxTokens": 128000,
            "api": "openai-completions"
          }
        ]
      }
    }
  },
  "agents": {
    "defaults": {
      "model": {
        "primary": "custom-47-99-200-103-8003/auto"
      },
      "models": {
        "custom-47-99-200-103-8003/auto": {}
      }
    }
  }
}
'@

$patch | openclaw config patch --stdin
openclaw gateway restart
Verify the Setup
Check the default model:
WSL Ubuntu / Linux / macOS:
openclaw models status --plainWindows PowerShell calling WSL:
wsl.exe -d Ubuntu bash -lc 'openclaw models status --plain'Native Windows installation:
openclaw models status --plainYou should see:
custom-47-99-200-103-8003/autoTest the model:
WSL Ubuntu / Linux / macOS:
openclaw infer model run --local --model custom-47-99-200-103-8003/auto --prompt "Reply exactly OK."Windows PowerShell calling WSL:
wsl.exe -d Ubuntu bash -lc 'openclaw infer model run --local --model custom-47-99-200-103-8003/auto --prompt "Reply exactly OK."'Native Windows installation:
openclaw infer model run --local --model custom-47-99-200-103-8003/auto --prompt "Reply exactly OK."Open the Dashboard:
http://127.0.0.1:18789/In the model dropdown, choose:
Default (auto (Custom Provider))or:
auto (Custom Provider)Notes
The TierFlow is backed by a model router, so OpenClaw only needs one auto model. The actual backend model, such as step3.5-flash, deepseek-v4-flash, or gpt-oss, is selected by the service.