
OpenClaw 接入 TierFlow 教程
本文介绍如何把 TierFlow 接入 OpenClaw。
基础信息:
| 项目 | 值 |
|---|---|
| Base URL | http://47.99.200.103:8003/v1 |
| 认证方式 | Bearer Token |
| 兼容协议 | OpenAI API |
| Provider ID | custom-47-99-200-103-8003 |
| Model ID | auto |
| OpenClaw Model | custom-47-99-200-103-8003/auto |
最终 OpenClaw 会请求:
POST http://47.99.200.103:8003/v1/chat/completions方法一:交互式向导
这是最适合新用户的方法。跟着终端里的问题一步步选,最后再把上下文窗口调大。
1. 打开终端
先确认你现在打开的是哪种终端。
如果你直接打开的是 WSL Ubuntu 终端,直接运行:
openclaw onboard --install-daemon如果你打开的是 Windows PowerShell,但 OpenClaw 装在 WSL Ubuntu 里,运行:
wsl.exe -d Ubuntu bash -lc 'openclaw onboard --install-daemon'如果 OpenClaw 直接安装在 macOS / Linux 里,运行:
openclaw onboard --install-daemon如果 OpenClaw 是直接安装在 Windows,而不是 WSL 里,运行:
openclaw onboard --install-daemon2. 风险确认和基础模式
向导启动后,会先问一些基础问题。
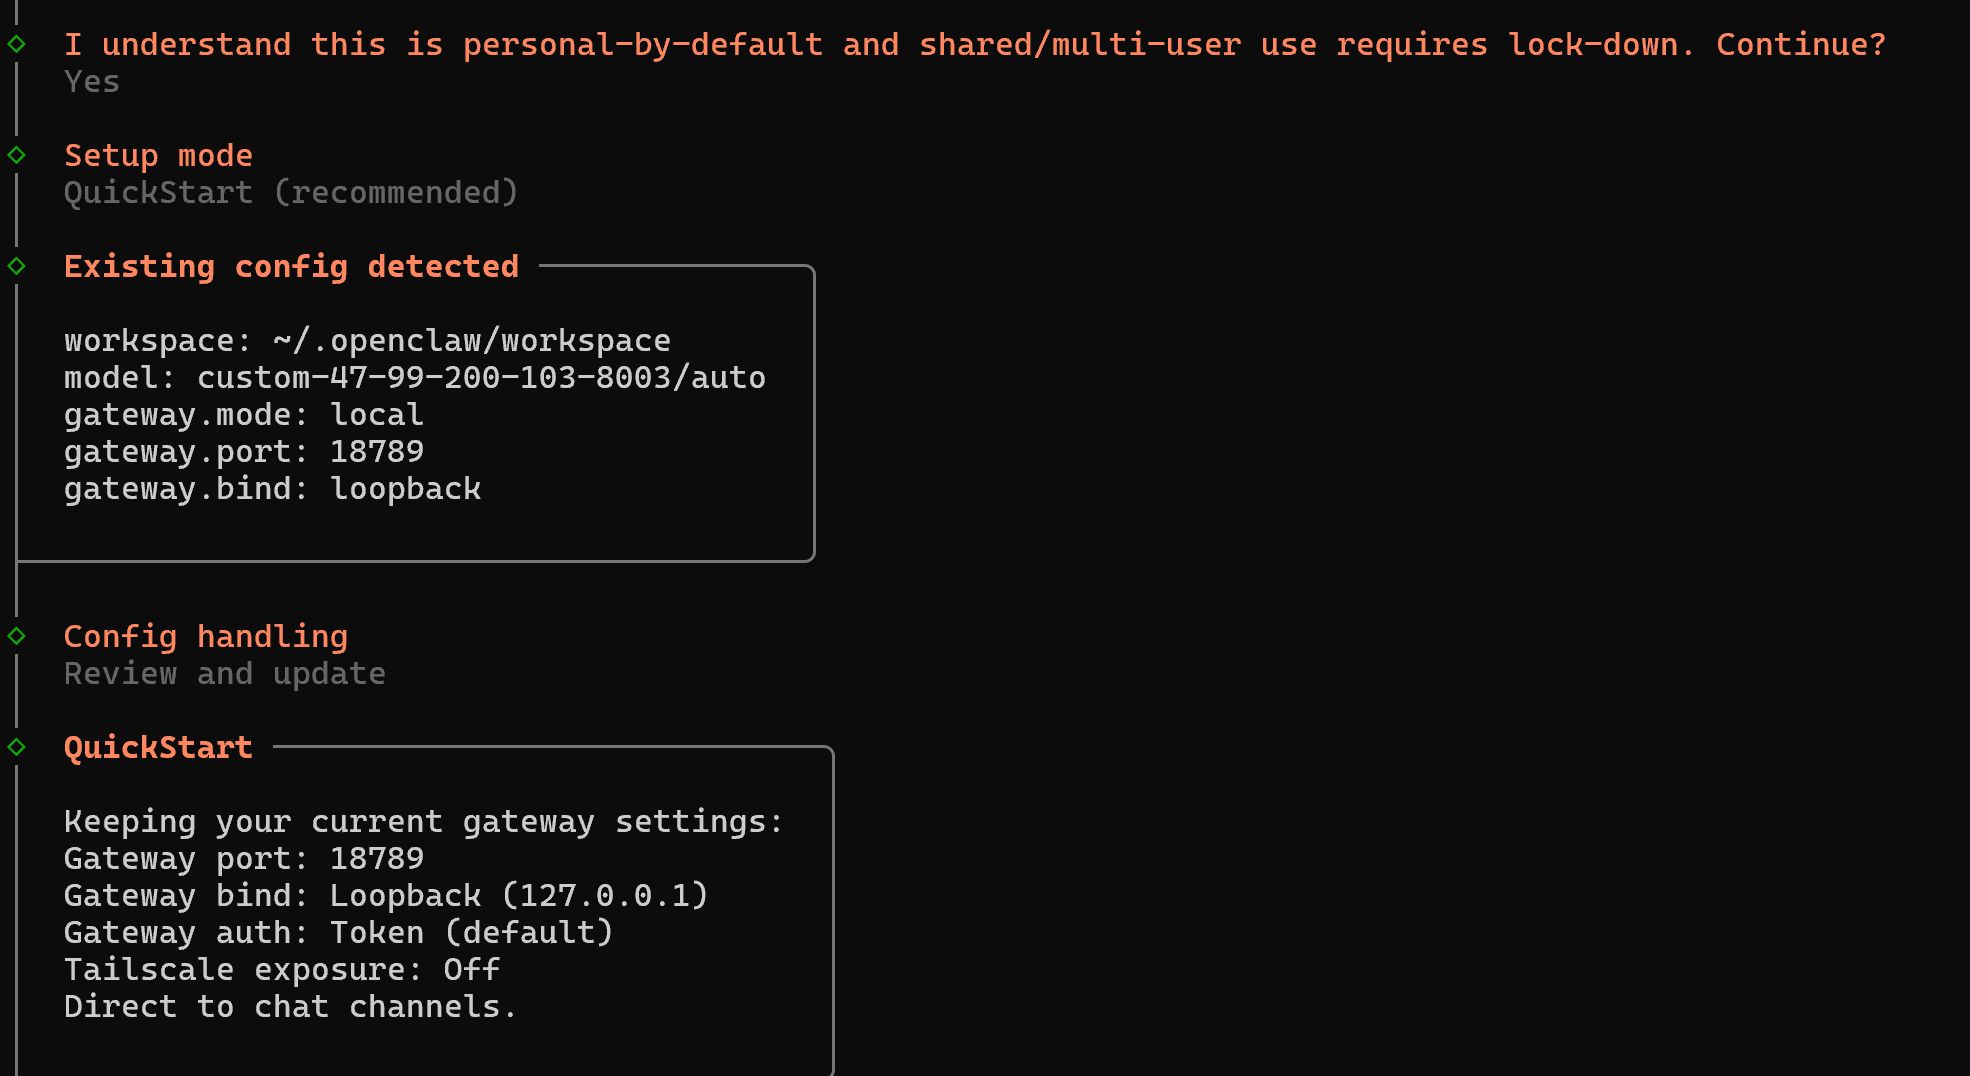
按下面这样选:
I understand this is personal-by-default and shared/multi-user use requires lock-down. Continue? -> Yes
Onboarding mode -> QuickStart
Config handling -> Review and update
如果你是第一次安装,没有旧配置,就按默认推荐继续即可。
3. 选择模型供应商
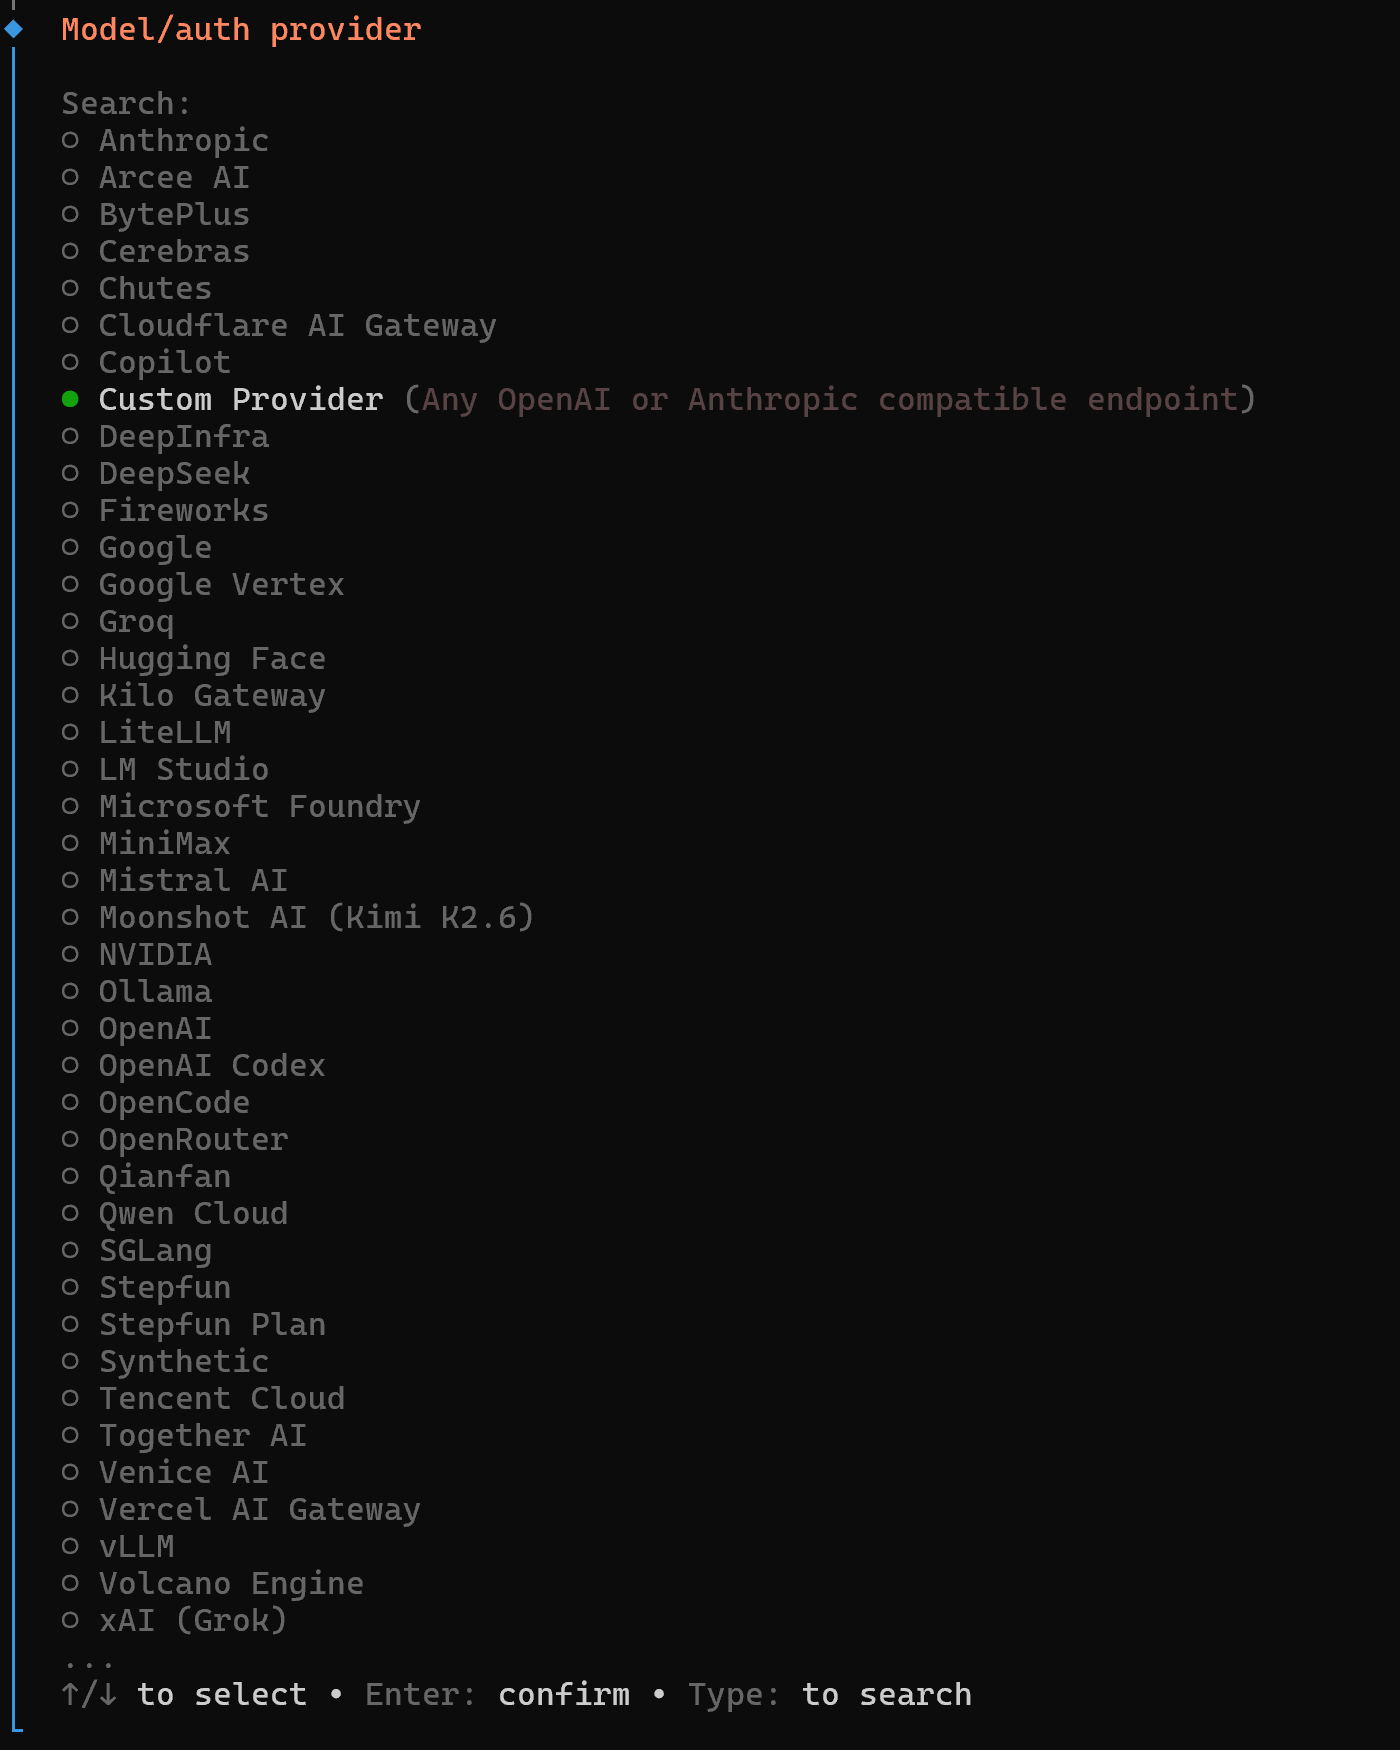
模型或认证方式选择自定义 API:
Model/auth provider -> Custom Provider有些版本里显示为:
Custom Provider (Any OpenAI or Anthropic compatible endpoint)看到 Custom Provider 或类似自定义兼容接口的选项,选它就行。
4. 填写自定义 API 信息
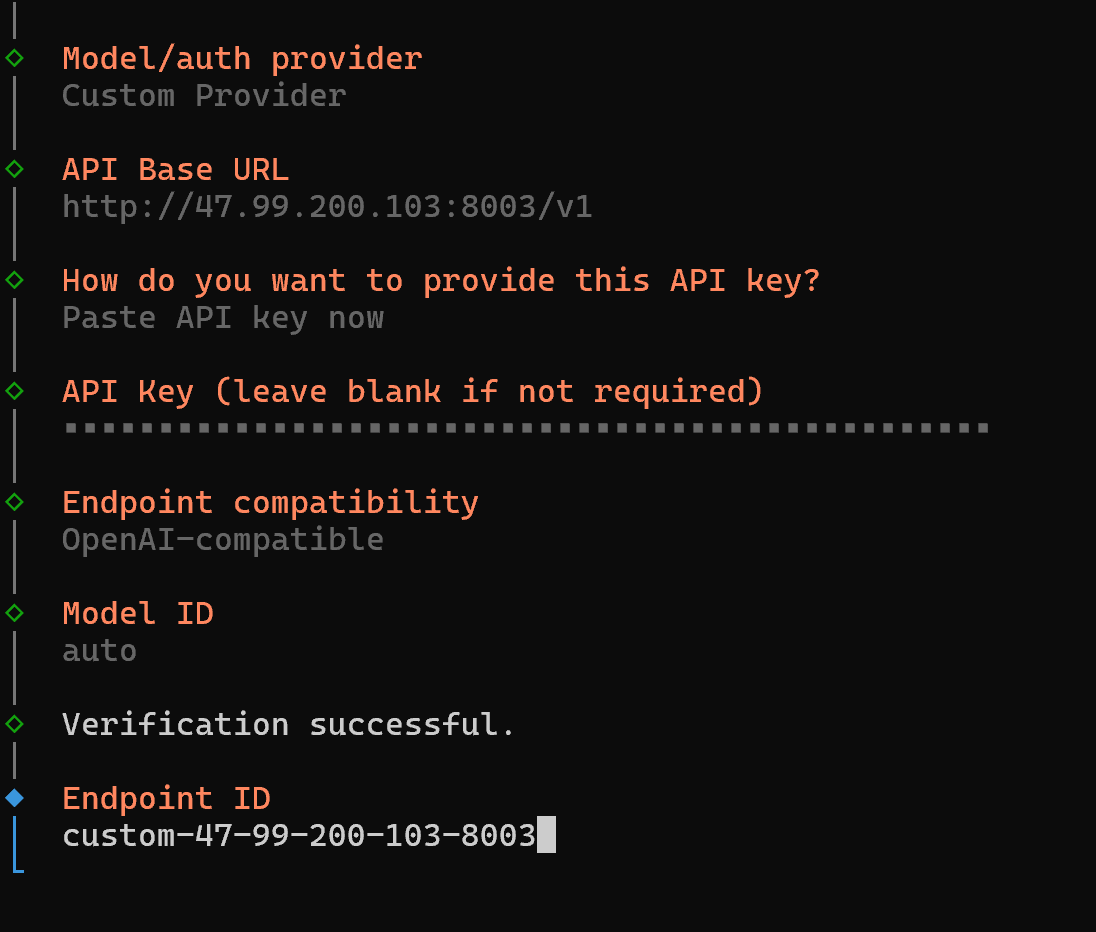
按下面填写:
Model/auth provider -> Custom Provider
API Base URL -> http://47.99.200.103:8003/v1
How do you want to provide this API key? -> Paste API key now
API Key -> 你的 API Key
Endpoint compatibility -> OpenAI-compatible
Model ID -> auto
Verification successful.
Model ID 固定填:
auto如果后面出现 Endpoint ID,保持向导生成的默认值即可,不需要额外配置。
如果问输入能力:
Input capability -> text如果问是否支持图片,选:
Image input -> No5. 继续完成后续配置
Select channel -> 选择你需要的渠道
Configure skills -> 安装你需要的 skills
Complete Setup -> 完成设置
6. 测试机器人
How do you want to hatch your bot? -> 可在 TUI / Web UI 中和机器人对话TUI:
openclaw tui如果能正常对话,就表示配置成功。
7. 已安装后只重新配置模型
如果已经配置过 OpenClaw,只想重新配置模型,不需要完整 onboarding。
WSL Ubuntu / Linux / macOS:
openclaw configure --section modelWindows PowerShell 调 WSL:
wsl.exe -d Ubuntu bash -lc 'openclaw configure --section model'Windows 原生:
openclaw configure --section model然后从“选择模型供应商”那一步开始继续。
8. 把上下文调大
向导默认可能会给自定义模型写成较保守的上下文。这个 API 是模型路由器,建议改成:
contextWindow: 1000000
maxTokens: 128000
如果你在 WSL Ubuntu 终端 / Linux / macOS 里,运行:
cat <<'JSON' | openclaw config patch --stdin
{
  "models": {
    "providers": {
      "custom-47-99-200-103-8003": {
        "models": [
          {
            "id": "auto",
            "name": "auto (Custom Provider)",
            "reasoning": false,
            "input": ["text"],
            "cost": {
              "input": 0,
              "output": 0,
              "cacheRead": 0,
              "cacheWrite": 0
            },
            "contextWindow": 1000000,
            "maxTokens": 128000,
            "api": "openai-completions"
          }
        ]
      }
    }
  }
}
JSON
如果你在 Windows PowerShell 里调用 WSL,运行:
$patch = @'
{
  "models": {
    "providers": {
      "custom-47-99-200-103-8003": {
        "models": [
          {
            "id": "auto",
            "name": "auto (Custom Provider)",
            "reasoning": false,
            "input": ["text"],
            "cost": {
              "input": 0,
              "output": 0,
              "cacheRead": 0,
              "cacheWrite": 0
            },
            "contextWindow": 1000000,
            "maxTokens": 128000,
            "api": "openai-completions"
          }
        ]
      }
    }
  }
}
'@

$b64 = [Convert]::ToBase64String([Text.Encoding]::UTF8.GetBytes($patch))
wsl.exe -d Ubuntu bash -lc "echo $b64 | base64 -d | openclaw config patch --stdin"
如果 OpenClaw 是 Windows 原生安装,也使用上面同一段 $patch = @' ... '@ 内容,只把最后一行换成:
$patch | openclaw config patch --stdin9. 重启 Gateway
WSL Ubuntu / Linux / macOS:
openclaw gateway restartWindows PowerShell 调 WSL:
wsl.exe -d Ubuntu bash -lc 'openclaw gateway restart'Windows 原生:
openclaw gateway restart方法二:手动编辑配置文件
适合想自己编辑 openclaw.json 的用户。
1. 找到配置文件
WSL Ubuntu / Linux / macOS:
openclaw config fileWindows PowerShell 调 WSL:
wsl.exe -d Ubuntu bash -lc 'openclaw config file'Windows 原生:
openclaw config file通常是:
~/.openclaw/openclaw.json2. 合并配置
把下面内容合并进 openclaw.json。如果文件里已经有 models 或 agents.defaults.models,不要删除原来的内容,只新增这个 provider 和模型条目。
{
  "models": {
    "mode": "merge",
    "providers": {
      "custom-47-99-200-103-8003": {
        "baseUrl": "http://47.99.200.103:8003/v1",
        "apiKey": "YOUR_API_KEY_HERE",
        "api": "openai-completions",
        "models": [
          {
            "id": "auto",
            "name": "auto (Custom Provider)",
            "reasoning": false,
            "input": ["text"],
            "cost": {
              "input": 0,
              "output": 0,
              "cacheRead": 0,
              "cacheWrite": 0
            },
            "contextWindow": 1000000,
            "maxTokens": 128000,
            "api": "openai-completions"
          }
        ]
      }
    }
  },
  "agents": {
    "defaults": {
      "model": {
        "primary": "custom-47-99-200-103-8003/auto"
      },
      "models": {
        "custom-47-99-200-103-8003/auto": {}
      }
    }
  }
}
3. 校验并重启
WSL Ubuntu / Linux / macOS:
openclaw config validate
openclaw gateway restart
Windows PowerShell 调 WSL:
wsl.exe -d Ubuntu bash -lc 'openclaw config validate && openclaw gateway restart'Windows 原生:
openclaw config validate
openclaw gateway restart
方法三:可选:命令自动写入
适合已经理解配置内容、想快速写入的用户。新手建议先看前面的交互式向导或手动编辑方法。
WSL Ubuntu 终端 / Linux / macOS
把 YOUR_API_KEY_HERE 换成你的 API Key:
cat <<'JSON' | openclaw config patch --stdin
{
  "models": {
    "mode": "merge",
    "providers": {
      "custom-47-99-200-103-8003": {
        "baseUrl": "http://47.99.200.103:8003/v1",
        "apiKey": "YOUR_API_KEY_HERE",
        "api": "openai-completions",
        "models": [
          {
            "id": "auto",
            "name": "auto (Custom Provider)",
            "reasoning": false,
            "input": ["text"],
            "cost": {
              "input": 0,
              "output": 0,
              "cacheRead": 0,
              "cacheWrite": 0
            },
            "contextWindow": 1000000,
            "maxTokens": 128000,
            "api": "openai-completions"
          }
        ]
      }
    }
  },
  "agents": {
    "defaults": {
      "model": {
        "primary": "custom-47-99-200-103-8003/auto"
      },
      "models": {
        "custom-47-99-200-103-8003/auto": {}
      }
    }
  }
}
JSON

openclaw gateway restart
Windows PowerShell 调 WSL
把 YOUR_API_KEY_HERE 换成你的 API Key:
$patch = @'
{
  "models": {
    "mode": "merge",
    "providers": {
      "custom-47-99-200-103-8003": {
        "baseUrl": "http://47.99.200.103:8003/v1",
        "apiKey": "YOUR_API_KEY_HERE",
        "api": "openai-completions",
        "models": [
          {
            "id": "auto",
            "name": "auto (Custom Provider)",
            "reasoning": false,
            "input": ["text"],
            "cost": {
              "input": 0,
              "output": 0,
              "cacheRead": 0,
              "cacheWrite": 0
            },
            "contextWindow": 1000000,
            "maxTokens": 128000,
            "api": "openai-completions"
          }
        ]
      }
    }
  },
  "agents": {
    "defaults": {
      "model": {
        "primary": "custom-47-99-200-103-8003/auto"
      },
      "models": {
        "custom-47-99-200-103-8003/auto": {}
      }
    }
  }
}
'@

$b64 = [Convert]::ToBase64String([Text.Encoding]::UTF8.GetBytes($patch))
wsl.exe -d Ubuntu bash -lc "echo $b64 | base64 -d | openclaw config patch --stdin && openclaw gateway restart"
Windows 原生安装
把 YOUR_API_KEY_HERE 换成你的 API Key:
$patch = @'
{
  "models": {
    "mode": "merge",
    "providers": {
      "custom-47-99-200-103-8003": {
        "baseUrl": "http://47.99.200.103:8003/v1",
        "apiKey": "YOUR_API_KEY_HERE",
        "api": "openai-completions",
        "models": [
          {
            "id": "auto",
            "name": "auto (Custom Provider)",
            "reasoning": false,
            "input": ["text"],
            "cost": {
              "input": 0,
              "output": 0,
              "cacheRead": 0,
              "cacheWrite": 0
            },
            "contextWindow": 1000000,
            "maxTokens": 128000,
            "api": "openai-completions"
          }
        ]
      }
    }
  },
  "agents": {
    "defaults": {
      "model": {
        "primary": "custom-47-99-200-103-8003/auto"
      },
      "models": {
        "custom-47-99-200-103-8003/auto": {}
      }
    }
  }
}
'@

$patch | openclaw config patch --stdin
openclaw gateway restart
验证结果
查看默认模型:
WSL Ubuntu / Linux / macOS:
openclaw models status --plainWindows PowerShell 调 WSL:
wsl.exe -d Ubuntu bash -lc 'openclaw models status --plain'Windows 原生:
openclaw models status --plain应该看到:
custom-47-99-200-103-8003/auto测试调用:
WSL Ubuntu / Linux / macOS:
openclaw infer model run --local --model custom-47-99-200-103-8003/auto --prompt "Reply exactly OK."Windows PowerShell 调 WSL:
wsl.exe -d Ubuntu bash -lc 'openclaw infer model run --local --model custom-47-99-200-103-8003/auto --prompt "Reply exactly OK."'Windows 原生:
openclaw infer model run --local --model custom-47-99-200-103-8003/auto --prompt "Reply exactly OK."打开 Dashboard:
http://127.0.0.1:18789/模型下拉框选择:
Default (auto (Custom Provider))或:
auto (Custom Provider)说明
TierFlow 后面是模型路由器,所以 OpenClaw 里只需要配置一个 auto 模型。实际走 step3.5-flash、deepseek-v4-flash、gpt-oss 等模型,由服务端决定。